Tuesday, October 26

Halloween Countdown

One costume down and two more to go....
No idea who she's supposed to be? You must not live in a Backyardigans-obsessed home (like ours).
She is Uniqua as the Flower Girl with Flower Powers.
"Flower POWER!"

Tuesday, October 19

Halloween Kiddie Crafts

With Halloween coming up soon, we've been getting in the spirit with some of crafty projects.

First up is Mini Pumpkins:
It's still too early for us to buy a big pumpkin (it's hot here, it would be mush by the time Halloween actually came around). So... to hold off the girls for a little while, I bought a bunch of different baby pumpkins. Then I gave them each a sharpie and let them decorate the pumpkins. OK... I couldn't resist decorating one or two... It's kind of fun.

Next up is our Spooky Mobile:
This was actually a present from my friend Joanne. Last year she sent us this great kit with everything you'd need to make Halloween masks (think Zorro not Scream). This year she sent the girls a kit to make this spooky mobile. I love these kinds of crafts because it works well for both girls. Plus who doesn't love bats with sequins and stars glued on them?? It would be pretty easy to recreate with your own bat and pumpkin cut outs. It would also be cute to do bats, pumpkins and ghosts. Just don't forget the sparkly decorations!

And finally is the Ghost Prints:
We actually did this at a community playgroup program that I take our 2year old to. It was super easy, and fun- just trace the hand and foot prints on construction paper, and cut them out, and decorate like ghosts. Our other daughter did something similar to this last year in preschool- except they actually stepped in white paint and made a print on black paper, and decorate with those googly eyes. I love crafts that use hand prints and footprints... without them I would never have a record of how they are growing.
Slowly but surely our house is getting decorated for Halloween! Now if I can just get started on Halloween costumes...

Sunday, October 10

Cake Mix in a Jar

I was first introduced to Cake Mixes In A Jar a few years ago at a class teaching different Christmas present ideas. I've 'taught' other people how to make them a few times since then, including at a "Christmas in October" Night offered at my church last week. I found the recipe that I used this time on www.recipegoldmine.com . They have a lot of different "Gift in a Jar" recipes. The one I chose was Chocolate Chunk Coffeecake. I made it ahead of time and it tasted great! These mixes in a jar are pretty straightforward, but here is the recipe with some pictures to clarify:

1 3/4 cups all-purpose flour
1 teaspoon baking powder
1 teaspoon baking soda
1/4 teaspoon salt
1 cup chocolate chips
3/4 cup packed brown sugar
1/2 cup chopped nuts

1. Sift flour, baking powder, baking soda and salt together in mixing bowl.

2. Transfer mixture to 1-quart wide-mouth jar. Cover your hand with a paper towel and press the flour down into the jar to pack it tightly.
If you are using a regular-mouth jar you will need to do this with a paper towel and spoon.
When all the flour mix is packed in tightly, use the paper towel to wipe off any powdery dust from the rest of the inside of the jar.

3. Pack in the brown sugar. The goal is not so much to get straight lines as to get crisp lines. You don't want the ingredients to bleed into each other.
Add the chocolate chips and nuts. Screw the lid on tightly.
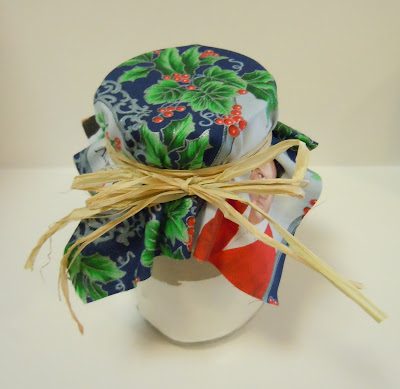
Decorate the jar with a piece of ribbon (or raffia) and 8”x8" piece of your favorite fabric.
Yes. That's Elvis peeking out of some of my favorite Christmas fabric. If you want more of your chocolate chips to show you can trim the fabric down to 7"x 7".

Attach the following instructions on a gift tag (hole punched and threaded through the ribbon):

********************************
Chocolate Chip Coffeecake
Makes 12 to 16 servings

1/2 cup (1 stick) butter, softened
3 eggs
1 teaspoon vanilla extract
1 jar Chocolate Chunk Coffeecake Mix
1 cup sour cream

1. Heat oven to 350 degrees F. Grease a 13 x 9-inch baking pan.
2. Beat butter in large bowl until smooth. Beat in eggs and vanilla extract until blended (mixture will be lumpy). Add jar mix and sour cream to butter mixture. Stir until well blended.
3. Spread batter evenly in prepared pan. Bake 25 to 35 minutes or until a wooden pick inserted into center comes out clean. Cool in pan on wire rack.
********************************
Easy and fun present to give any time of the year!

Saturday, October 2

Bee-Bim Bop!

A few weeks ago our 5yr old's Kindergarten class read the book Bee-bim Bop! by Linda Sue Park. It sounded like a fun book so I borrowed it from our local library. The story is about a girl 'helping' her mom as they go through all the steps of making their dinner- Bee-bim Bop. At the end of the book the author has included a recipe for the dish they are making in the story, along with suggestions on how to divvy the work between the child and the grown up. We decided to give it a try, with great results! Our 5 yr old loved helping out with the cooking,
(especially squishing the marinade into the meat with her hands)
and the dish was delicious! And I was happy because it got my kids to eat vegetables they wouldn't have usually touched with a ten-foot pole (bean sprouts and cooked spinach). Aren't those egg ribbons pretty?
Bee-bim Bop gets a big thumbs-up in our house!
If you don't want to get the book, check out this recipe, it's pretty much the same as the one in the book. Enjoy!